Thursday, April 21, 2022

HC-06 Set Name

Try this Arduino  sketch to set the device name for an HC-06 device.  


/*
 * David Dold
 * JDDL Design, LLC
 * 
 * HC-06 differs from an HC-05.  HC-06 are slave only devices,  
 * whereas HC-05 can be master or slave. 
 * By default an HC-06 device is in AT mode @ 9600 
 * baud between Arduino device and HC-06.
 * 
 * An HC-06 does not respond to "AT" with "OK"
 * 
 * The response from an HC-06 device for "AT+NAMEwhatever" 
 * is OKsetname
 * 
 * LEDs flashing on the HC-06 indicate command mode, steady indicate   * established BT connection.
 * 
 * NOTE: If you maintain a BT connection, via a terminal session or 
 * mobile app, then the AT commands
 * will simply transmit to the connected device.  
 * 
 * The HC-06 spec sheet calls for divided resistors and RX, I've 
 * never done it...  
 *  
 * TROUBLESHOOTING 
 * If you are unable to get this to work, confirm your rx/tx pins   
 * are correct.  Confirm your wiring with a Serial BT Terminal.  
 * On Android there are many to choose from.  Pair your HC-06 with 
 * your phone, then connect to the device via the BT terminal app, 
 * LEDs on HC-06 go solid. Run this sketch.  Characters sent from   
 * the send textbox via the serial monitor or sent from the app, 
 * echo on the opposing device.  If your characters do not appear, 
 * re-check your wiring (hint is tx/rx reversed?).
 * 
 * If you are using separate power supplies for your Arduino device 
 *   -and- the HC-06, the grounds must be bonded. 
 * 
 * Setting baud rate is for the hardware connection between 
 * processor pid and the HC-06 device.  BT connection is negotiated 
 * between radios.
 *
 */

#include <SoftwareSerial.h>
#define BLUETOOTH_TX 10
#define BLUETOOTH_RX 9
#define BAUDRATE 9600
SoftwareSerial bluetooth(BLUETOOTH_RX, BLUETOOTH_TX);
void setup() 
{
  Serial.begin(BAUDRATE);
  Serial.println("ready");
  
  pinMode(BLUETOOTH_RX, INPUT);
  pinMode(BLUETOOTH_TX, OUTPUT);
  //setup bluetooth
  bluetooth.begin(BAUDRATE);
  bluetooth.flush();
  delay(100);
  bluetooth.write("AT+NAMELifeMCP");
}
void loop() 
{
  //optionally, send characters via the SerialMonitor, this can be commented out and the bluetooth.write in setup() works.
  //outbound to HC-06
  if(Serial.available())
  {
    Serial.println("writing to bt");
    while (Serial.available())
      bluetooth.write(char(Serial.read()));
  }
  //inbound from HC-O6
  if(bluetooth.available())
  {
    Serial.println("BT Response");
    while (bluetooth.available())
    {
      delay(3);
      Serial.print((char)bluetooth.read());
    }
    Serial.println();
  }
}


Saturday, December 5, 2020

2005 GM 8.1 LTFT Case

CASE GM 8.1 LTFT - HOW TO KILL A CAT

Vehicle:  2005 Workhorse GM 8.1l

ISSUE:

Progressively high LTFT fuel trim cells at load (data below) Vehicle has 50k miles, orig owner.

NO MIL, Codes, Pending Codes

Initial drive-ability issue: surging from rolling stop until trans downshift; rolling through stop sign... Found misfires at idle mainly cylinder 6, no DTC. Found throttle body plate dirty with minor carbon buildup

.


ACTIONS

  1. Replaced fuel filter, fuel pressure check under load OK 
  2. Replaced original sparkplugs/wires OEM AC Delco 41-983 gap .06
  3. Removed K&N, replaced with OEM  AC Delco A1236C
  4. Cleaned Throttle body plate (CRC TB Spray Cleaner)

  5. Compression test all cylinders 170-175.
  6. Borescope insp cylinders, nice and clean piston heads.


  7. X66P injector cleaning asper GM TSB (10% solution with OTC 7448A)

  8. Tech 2 Injector Test: all injectors drop from 55 to 37#
  9. Injector leak-down test, 56# held 90 minutes.
  10. Replaced both 02 sensors with AC DELCO 213-1161 (possible silicon contamination)

  11. Cleaned MAF with (CRC MAF Spray Cleaner)
  12. Cleared fuel trim data w/ Tech 2

Misfires resolved, low rpm surging resolved.

DISCOVERED LTFT ISSUE:

Test drive San Diego to Jacumba on I-8 elevation change app 4,100.  Vehicle runs normal.

STFT are high, then ECM quickly learns to adjust with high LTFT

•  Cell 1 / IDLE
   STFT oscillating around 0 +3/-3
   LTFT 0 / 0 o2 sensors immediately respond to induced vacuum leak.

• CELL 5
   STFT (not sure)
   LTFT +7/+7


• CELL 14
   STFT +2/+3
   LTFT +17 / +16

• CELL 19
    STFT 0/0
    LTFT +20/+19

•  CELL 21
    STFT 0/0
    LTFT +21/+17

• CELL 22
   STFT 0/0
   LTFT +17/+17

Video before Power Enhancement / Open Loop


NEXT STEP: Running theory is the K&N damaged the MAF creating an insulating film on the heat-wires causing the MAF to under-report and creating the lean condition at high load.

Replaced MAF with Delphi 25318411. 


RESOLUTION:

Proof K&N filter caused this issue by damaging MAF Sensor causing sensor to underreport and create a lean condition.  I lost my bank 1 catalytic converter because of a K&N Filter.  

K&N Filter cost me over $2,000 in vehicle damage and that is parts only!   

The proof is in this video.


TAKEAWAYS:

  • Do not count on the MIL
  • Part of routine maintenance, check LTFT by Fuel Trim Cell at various LOAD factors
  • GM 8.1 at idle MAF should be app 8 g/s
  • GM 8.1 WOT MAF should be app 230 g/s
  • STAY AWAY FROM K&N AIR FILTERS


THANK YOU!


SPECIAL THANKS!

Without the video below from Mike Becker at Wells Tech, I would still be chasing my tail going after fuel injectors under the false impression MAF sensor cleaning works; it does not.  

 Wells TechConnect Ep. 19--Does cleaning a mass air flow (MAF) sensor really work?


CONFIRMED CALIBRATION


THANKS!


Saturday, October 10, 2020

Quickbooks 2010 on Windows 10


YES! 

Quickbooks 2010 runs on Windows 10.

 I am no fan of Intuit, did I say that out loud?  Its true, from grad school days where a VC spoke and said, "we will not invest in a company running on Quickbooks."  

If you are not running payroll, and you believe the following to be true:  1+1=2, then there is no need to waste money with Intuit upgrading Quickbooks.  Despite what you may have read online... blah-blah-blah Windows 10 and the demise of Flash Quickbooks 2015 and below are no longer supported.  NOT TRUE!

Installing QB 2010 is as simple as 1-2 (that's it, no 3)

  1. Prepare Windows 10
  2. Install Quickbooks (QB)
    • To avoid the QB installer from checking for pre-requisites, install QB using the quickbooks.msi installer, install using the Windows troubleshooter.
      • Browse your install cd to the Qbooks folder, right click quickbooks.msi


You are done!


Thursday, December 1, 2016

Effective Backup Strategy

Losing a hard drive, can ruin your life.  Well, maybe not that dramatic, but the loss of a drive can create sleepless nights struggling to recover lost files and get back to where you the instantaneous moment before the tragedy.  Like most mechanical devices, invariably there are signs things are about to go sideways.  One of my favorite scenes in Bruce Almighty is when Jim Carey is following the flat bed truck, all pissed off trying to get around it wondering why God is not giving him a "sign."  Warning, danger ahead, do not pass; all the signs ignored, he passes the truck and winds up in the bay.  Supposedly that scene was shot in San Diego.  Bad sectors, unusual noises, degrading performance are all signs that should be revealed before it gets to that point by adhering to a monthly schedule.

Structure!  On the first of every month, do a little preventative maintenance on your workstation or laptop.  I lost a hard drive and discovered my hap-hazard cloning was not actually working because of large-disk-drive bug in the utility I was using.  I never actually tested the cloned drives; duh.   Then the unthinkable happened, I lost a drive and thought my world was coming to an end. I finally had to accept I could not recover the drive and it was 100% my fault.

I called my co-lo provider and asked them for advice, they are linux guys and recommended Clonezilla.  Clonezilla  is an open-source, linux based utility that does several types of cloning, by device, file system, network.  Using Clonezilla and incremental backups to "the cloud."  I will never lose anything ever again.  Windows backup/restore is a royal pain, its too complicated, it is slow and requires a bootable device and is it really working, there is a better way.

An effective backup strategy includes taking periodic cold-backup of the drive, a clone, with daily incremental backups to the cloud.  I use Cox Business for my incremental backups, but there any many choices out there.

For an effective backup strategy you need at least 2 drives of the same size.  I primarily use Seagate 2TB Barracuda drives, but I also have a 2TB Western Digital in the mix of four drives.  You can use varying drive sizes, but that adds a level of complexity with a possibility of error and the goal here is to make this process simple, quick and reliable.   This is for windows, but it works with any operating system.  Windows licensing uses several devices to determine if you have a new machine or simply made a change to an existing setup.  It will not require re-licensing a windows installation cloning a drive.

Before beginning label each hardrive with its serial number, you will need this to ensure you source and target drives are correct.  You will also need a bootable Clonezilla CD.

On the first of every month do the following:


  1. Run chkdsk from a command windows on all partitions.  This will detect any file system problems.  There is no point cloning problems.  If anything is detected it must be repaired here if possible before cloning, if not possible still continue.  
  2. Run cleandisk or bleachbit to cleanup your temp directories and updates. (optional)
  3. Run harddisk vendor utility to scan the drive.
  4. Shutdown the PC
  5. Connect the target drive from the oldest drive in your rotation to your pc.  (for a laptop use a USB hardrive adapter)
  6. Boot into clonezilla.
  7. Select device to device clone.
  8. /sda is the source, /sdb is the target map /sda to the serial number of the drive you are currently using.  If you make a mistake you will wipe out your last thirty days.
  9. Skip all the file system checks, we all ready did that in the first three steps.
  10. Include sector 0 or the boot sector in the clone.
  11. It takes about an hour to do 2tb drive.  Device-to-Device is create an exact sector by sector clone from the source to the target drives.
  12. When completed, swap the drives.  This is a critical step, it shows that your clones actually work.  On a laptop best you can do is confirm the drive with the usb adapter, or open it up and swap the drives out.  


Thursday, November 3, 2016

Vinegar in the Wash

How can vinegar be a fabric softener?  It is basic high-school chemistry.  To review, what is the pH scale and what are acids and bases?  From the Chemistry Department at Elmhurst University   The pH scale measures how acidic or basic a substance is. The pH scale ranges from 0 to 14. A pH of 7 is neutral. A pH less than 7 is acidic.  Acids and bases neutralize each other.
What is soap?  Soap and bleach are bases, fabric softener and vinegar are acids. Rough fabric is from the residual build of soap, to neutralize this buildup you need an acid, both softeners and vinegar alter the pH of the water to act as an acid and remove the residual soap; either works great. pH of Downy is a 5, vinegar is a 4, neutral is 7. How you dispense is largely dependent on the pH of your tap water. On my front loader, a Kenmore HE3, essentially a Whirlpool Duet, after the wash there is a clean-water rinse, then the bleach cycle, then a final rinse. In the last rinse the fabric softener is dispensed. You can verify this yourself, during a cycle there is servo motor that moves a water director to shoot into the various dispenser compartments, pull the dispenser drawer during a fill cycle and see where the water is shooting from. According to Whirlpool, they wash-rinse-bleach-rinse because bleach is more effective in cold water and if it is not mixed with detergent. To mitigate the concern of acid remaining, I use the bleach cycle instead of the fabric softener dispenser. Using the bleach cycle to dispense the vinegar or fabric softener, you get two benefits; the washer -and- the fabric finish with a clean water rinse removing any latent soap/softener residue. For whites with bleach I put the vinegar in the fabric softener dispenser, the machine is designed for it anyway.
Know the pH of your tap water to most effectively clean your clothes, pick up some litmus paper. In San Diego the city adjusts the pH to slightly over 7, as do most municipalities, they do this is to prevent corrosion in metal pipes including copper, think Flint MI. If your water is acidic (below 7), use more soap, or an additive like Borax, to raise the pH of the water to clean better, then use less softener; flip if your water is an alkaline.
Bottom line: both vinegar and fabric softener are acids.

Sunday, October 16, 2016

Workhorse W-Series Cooling System Service

Of all the scheduled maintenance, changing the radiator coolant is one of those systems easy to neglect.  The thing is, if the cooling system is properly maintained, changing the coolant is a snap.

How to test your coolant:

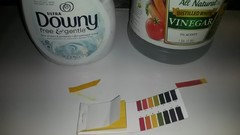
To test your coolant, you will need a voltmeter, litmus paper and a refractometer.   These items are available on Amazon for under $20.


Use a refractometer to test your water/coolant ratio.  This device, available on Amazon for under $60, has rave reviews, it is affordable and easy to use.


The concern here is freeze/boil protection with the correct water to coolant ratio and the inhibitors in the coolant.  The water to coolant ratio is a bit like Goldilocks.  Water is excellent at heat dissipation, too much coolant and you cannot bleed off enough heat from the engine, too little coolant and you do not have sufficient freeze/boil -and- insufficient inhibitors.  The goal is 50/50 which is -34 Fahrenheit.  The glycol/water ratio remains constant overtime, this test does not indicate the health of the coolant.  With one drop of coolant, the alcohol bends the light rays differently from the water and you get clear reading for freeze protection.


For background on Dex-Cool check out this guy's post:  All About Dex-Cool   A veteran GM engineer told me besides the rust inhibitors, Dex-Cool also acts to prevent electrolysis occurring generating current as the coolant flows over the varying metals in the cooling system; Iron, AL, brass and the coolant acts like a battery.  I had to see this one for myself.  With your volt-meter set to DC,  put one prob in the coolant the other to ground with the motor running and the thermostat open.  Ideally you should have < .3 volts, as the voltage increases, electrolysis is occurring and eating away the soft metals in your cooling system namely AL heads, head gaskets and the heater core.  Be mindful of the coolant temp before you remove the radiator cap.   The second test is the pH of the coolant.  In time as the inhibitors degrade the pH of the coolant becomes acidic.  Think Flint, MI as the water in the cast-iron pipes became acidic instead of an alakaline, the pipes were destroyed, acids eat metal.  Your coolant should have a pH of 8 or 9.  It is the components, not just freeze and boil over protection which remains constant over time, we want to test and ensure the coolant is doing its job protecting the engine, radiator, seals, head-gasket, water-pump and heater core from electrolysis, corrosion and ultimately failure.  This service is cheap protection.

Regardless of the above tests, if  its been five years or 150k miles, it is time to service your cooling system.  Along with a coolant flush, this is an excellent time to replace the upper and lower radiator hoses, thermostat, serpentine belt, tensioner and idler-pulley as well.  Since I am doing this myself, I use ACDelco parts and reward myself with buying any tool I may need, like a refractometer.   The good news is Amazon sells ACDelco parts at a steep discount.  This is my rationale, a failure of any of these parts and not only is my journey interrupted, but I am now paying labor charges and full-retail for no-name parts, and arranging a tow; easily avoidable. Save your money, a trip to the shop and enjoy the satisfaction of doing your own work. 

The cooling system on a W-Series 8.1 liter holds 23.5 quarts, throw in the heater core and lets round up to 6 gallons, Winnebago owners with Motor-Aid need to add more capacity for the heat exchanger in the water heater.  The 8.1 holds over two gallons of coolant in the block.  The shops I have asked, tell me whatever comes out of the radiator is what gets replaced in a simple coolant change, that is just not enough coolant.   With nearly 1/2 the coolant in the block, you need to drain block as well as the radiator it to do this job.

Tools you will need:
  1. Both a 5/16 or 8mm 1/4 socket with ratchet and nut driver. 
  2. 3/8 Ratchet with 15mm socket
  3. 1/2" or 13mm ratcheting wrench
  4. 1/2 ratchet and extension
  5. Flat screwdriver
  6. Channel Locks (optional)
You will also need two specialty tools:
  1. 1/2" 17mm hex socket (available on Amazon) to remove the engine block drain.
  2. Hose clamp removal pliers, Sears may stock this item.

Parts list for 2005 W-Series:
  1. Lower Hose ACDelco 24397L (Amazon)
  2. Upper Hose ACDelco 26163X (Amazon)
  3. Heater Bypass ACDelco 1255-8968 (Amazon)
  4. 195 Degree Thermostat ACDelco 131-121 (Amazon)
  5. Serpentine Belt ACDelco 6K1080 (Amazon)
  6. Idler Pulley ACDelco 1258077 (Amazon)
  7. Belt Tensioner ACDelco 39702  (eBay)
  8. 3 Gallons DexCool ACDelco 10-101  (Jegs best price)
  9. 8-10 Gallons distilled water. (Wolly World)
  10. 2 1-1/4 - 2-1/4" Hose Clamps (parts house)
  11. 2 1/2 - 1-1/4" Hose Clamps (parts house)
  12. "Yellow" teflon tape (hardware store)
Down to business
All work is done from below, no mess inside.   I wear a beanie to insulate my noggin from all the sharp points and edges.   I have Gladys Kravitz for a neighbor, Brad, so I take extra care to collect all coolant, which is a challenge on this chassis and the right thing to do anyway.  Start by removing the serpentine belt, tensioner and idler pulley from the passenger side.  The belt pattern is fairly simple, so dont worry about it right now.  The tensioner has a 3/8 socket opening, use it to take the tension off the belt and remove from the idler, water-pump or alternator.  Keep the belt as a spare.  This belt with the oversized alternator and power steering takes a real beating.  This tensioner is not very strong, you can do it with your hand or use a 3/8 ratchet.  Now remove the tensioner and the idler pulley, both have a 15mm bolt.  Removing the belt and idler pulley makes changing the thermostat housing  easier opening up access to the three 13mm bolts holding the thermostat housing.  

You are now ready to drop the coolant.  Do not discount the need to remove coolant from the block.  Almost 1/2 of the system's coolant is in the engine.  Start by removing the radiator cap to allow air to come in.  If you have the factor clamps, use the specialty pliers to remove the lower radiator hose from the water pump.  Have buckets ready to catch coolant from the water pump and then bend the lower hose into another bucket.  I use a 2 and 5 gal bucket.  It is a good idea to have a tarp and towels down to catch and collect the inevitable coolant that misses your buckets.  There is no peatcock on the radiator, its the lower hose and drain plug on the block.  Next remove the 17mm hex drain plug from the left side of the motor.  You are going to repeat this two-step drain process two more times, experiment...

Coolant will rush out of this drain.  There is no great way to catch it all because of the frame.  

Now its time to remove the thermostat housing.  Unless you are a masochist, this part sucks.  You may find yourself exploring some dark thoughts directed to whomever decided these hose clamps were a good idea.  I believe it normal and healthy to let a few a expletives out during this part, it gets darker getting the heater bypass hose out.   Leave the upper hose attached to the housing, it is one less (sucky-factory) clamp to remove using the tool bloodying your knuckles.  Remove the upper clamp at the radiator, remove the three thermostat housing bolts, a 13mm or 1/2" ratcheting wrench makes this part easier.  Remove the upper hose from the housing using channel locks and keep the factory netting, this netting allows the upper hose to slide over the fan shroud instead of binding.

 With the three screws  out of the housing, using your hand break the housing free and pull the housing and hose out past the fan.  Remove the old thermostat and make sure you get the old rubber seal.   Now comes the hard part, removing the heater bypass hose.  You may be tempted at this point to skip-it, but you are this far and why risk it?  Think of the stress that little hose is subject to; extreme heat from the coolant and engine all those times you had to race to the top of the hill pulling your toad.  Your here, there is no hurry, have a beer and keep going.  I needed a ball-gag at this point to suppress the f-bombs I was dropping getting this little hose out.  Clean up the housing with 2000 wet dry, clean the gunk off the hosing and the water pump for the lower hose with a wire brush or some 600 wet dry.  The hard part is over.  You have just had an abject lesson on why a shop might be tempted not to change the thermostat or bypass hose, yet charge you anyway.

Its time to put it back together.  Replace the thermostat, ensure the rubber seal it came with is properly attached to the thermostat, housing is printed side up.  Drop it in.  Replace the hosing ensuring it easily goes against the block, this will confirm you have the thermostat seated properly.  Do not force anything.  Install the heater bypass hose using your new hose clamps.

Reuse the netting from the upper hose on the new hose,  Once the thermostat hosing is in and tight, install the upper hose, now install the new idler pulley and tensioner.   Remove, empty and clean the coolant overflow tank and re-install.  Time to install the new belt referring to the serpentine pattern below.  Start from the driver side.


Duct tape or an assistant will make this part easier.  Start by placing the belt over the AC pulley, then over the power steering pulley.  Go up and around the waterpump, the ribs will face out over the water pump.  Go around the crankshaft pulley.  To avoid another round of expletives, tape the belt in place over the AC and PS.  Time for you to switch to the passenger side.  Put your 3/8 ratchet into the tensioner, play with it a little bit to get a feel about how it works.  Gingerly place the belt around the alternator.  Your goal is to avoid a trip back to the driver side.  In one move, retract the tensioner, and pull the belt below the idler.  If you are not in all the groves, thats ok.  Take a little break and come back to it.  Remove any tape.  Adjust any pulleys where the belt is not fully in-place by removing tension with the ratchet on the tensioner.

Congratulations, you are almost ready to test, the rest of the job is easy.

Install the lower, replace the drain plug in the block hand-tight and no teflon tape yet.  Go back over everything, checking the five bolts and four hose clamps.  

The next step is to flush the system using distilled water repeating the drain process above.  It is all about pH and impurities; no tap water.  If you are keeping up with coolant changes, power-flushes and additive chemicals are not necessary.  With the motor off, you can get a couple gallons in the radiator.  But wait, you still need to confirm the serpentine belt without starting the motor.  Click the key a couple of times without starting the motor to move the belt and re-inspect.  If the belt gets thrown, oh well its not going far, try again.  The belt should now be fully seated in all pulleys and look good on the idler pulley and waterpump.   If you are satisfied, start the motor and be ready with 2-3 gallons distilled.  Keep adding distilled water.  Turn on heater inside, to speed things up, place cardboard over the radiator.  Using a scantool if you have one, bring the temp to 195 to open the thermostat.  The radiator should start "burping" and take another gallon distilled water.  The goal is to dilute the remaining illusive gallon of coolant still in the system with distilled water.  I do this flush twice, never using tap water.  You want to dilute the remaining old coolant as best you can.  Collect and dispose the discharged coolant as per your local requirements.    Measure what you get out of each flush.  You should have gotten 4.5-5 gallons from the radiator and block.  The system takes 6 gallons.  Assuming you are staring with a 50/50 concentration and drain 5 gallons out, your first flush you are at 8% concentration, second flush drops down to 4%.  Point is, there is still some old coolant in the system.  Dex-Cool is not to go above 70% concentration, target is 50%.  Assume there is still 2 quarts of old coolant in the system after two 5 gallon flushes.  For your last fill, use the teflon tape on the drain-plug and tighten, start by adding all 2.5 gallons or adjusted amount of Dex-Cool to the system and top off with two gallons or more of distilled water.  Adjust the amount of Dex-Cool based on what you removed in your flushes and dilution levers.  For 50/50 you would add 12 quarts.  Using all three gallons, with two 5 gallon flushes leaves a 58% concentration.  

Re-test your voltage and pH, you should at our around .3 volts and a pH of 8.


The final test, do you have the water/coolant ratio correct?  Too much bad, too little bad; 50/50 -34F freeze protection; just right.  I am about -32F, I could put straight dex-cool in the reserve bottle, but that might be a bit obsessive.


Pat yourself on the back, put on some bandaids, document your work for your records and know the work was done and done right.

SUMMARY:

Regardless of who does the work,  Trust, but VERIFY.  If a shop does the work, demand the shop prove to you they did the work, check your own work.  Demand, in a nice way, they show you the pH and the refractometer results.  You could be saving your motor.  


Correcting too little coolant.

On my Sierra Duramax I had freeze protection of -25F, target for 50/50 is -34F.  How to correct this:   The capacity for a Duramax pickup up with auto trans is 25.4 quarts, round up to 26 quarts, 50/50 is 13 quarts coolant.  Using the chart below, capacity 13quarts x2, I determined I had was missing two quarts of coolant and the ratio was roughly 46%, probably not a big deal.  To jump the missing one quart, I removed one gallon of coolant from the truck, then added a three quarts coolant and topped off with distilled.


Tuesday, April 5, 2016

Gear Oil

I enjoy doing mechanical things working with my hands.  Ten years ago, taking my new duramax in for service and finding the dealer had elected to forgo lubricating the chassis, a decision they say was made by a rogue mechanic, I decided to take the maintenance of my vehicles on myself.  This way, I would become more familiar with my vehicles and right or wrong I became responsible.  Not to mention saving money.

I simply do not drive that much, most of my maintenance comes down to annual vs by mile.   Everything gets an annual service from my two vehicles, motorhome and generators.  I have stayed ontop of all schedules maintenance including transmission service,  radiator flushes, replacing radiator hoses, thermostats, idler/tensioner pulley and serpentine belts at five years.  It is cheap insurance to avoid both costly repairs and breakdowns.  I can do this work for 25%, with AC/Delco and Mopar parts, verses taking it to the dealer.  Moreover, I have the pride in doing it myself.

The subject of this post is differentials.  It is easy to ignore the differential in your vehicle.  Front wheel drive with a transaxle is handled by scheduled transmission fluid changes, but on a rear wheel drive or 4x you have one and two traditional differentials.  For me, I have a 3/4 GM Sierra, a TJ Rubicon and a Workhorse w-20.  GM built the differential, but the Jeep and W-20 have Dana, specifically Dana 44 and Dana Spicer S110.

There are three types of differentials, open, limited slip, and gear based posi-traction.  A differentials job is to compensate of the delta in wheel speed when you go around a corner.  Without this, the inside tire would have to break traction.  From "My Cousin Vinnie" an open differential is when you get the stuck in the mud and one tire spins and spins and the other tire does 'nothen.  Limited slip attempts to provide traction to both wheels when one side loses traction.  Performance cars do this, it helps distribute power output to both wheels.  Off-road vehicles do this to provide better traction.  Locking differentials, unlike limited slip, use a collar that make the axle solid, this makes going around a corner nearly impossible with out something giving like snow, rain or dirt or the tread of your tire.  This is why it hard on your 4x to drive in four wheel drive on dry pavement.  Mechanical devices suffer from non-use as much as abuse.  It is important to make it habit to shift your 4x in and out of four wheel drive and high and low range.  Rainy days are a good time to run in four wheel drive.

Fluid.  Unlike motoroil the type of fluid is not backward compatible.  Manufacturers will recommend a weight, 75w90 synthetic GL/5.  Oil comes in thickness, the lower the number the thinner the oil.    GL/5 is not an improvement of GL/4.  In fact using GL/5 in a GL/4 application can destroy the "soft or yellow" metals like brass found in older vw differentials and manual transmissions.  Manual transmissions contain soft metal "synchros" these floating gears help to align the gear to shift without grinding, it makes shifting smooth and requires less "double-clutching" techniques.  

Clutch based differentials require a limited slip agent.  Regardless of what Jeep says, I finally called Dana and gave them the build numbers from the diffs on my Jeep.  Because of the air-lockers these differentials are open and have no limited slip, therefore, the additive is a waste.  On a light duty vehicle, the additive on an open differential will not make any difference.  Keep in mind this is not the only error Chrysler has in the owners manual.  They list GL/5 for a manual transmission, the sulfer in GL/5 which helps the oil stick to the gear will eat the syncrhos.  Two strikes...

The Dana Spicer 110 is a different animal, this is heavy duty axle rated at 15,500#.  This is an open differential and used in a variety of over the road (OTR) applications.  What Dana recommends is GL/5 75W-90 synthetic, no additive.  In a heavy duty environment the LS additive can oxidize and has a shorter life with diminished efficacy cushioning the gears.  Only problem is trying to find it without buying a 50 gallon drum.  I called Mobile1, Lucas, Royal Purple, they all arbitrarily add some ls additive.  Finally, I stumbled onto Mobile Delvac in one gallon at Zoro (my fav anti-amazon site).  This is rated to 500k miles between drains.  For an RV this interval would never happen, but oil breaks down over time.  My rig has 40k miles on it, but its 10 years old.  I was shocked at the sludge and gunk that I vacuumed out of my s110.  Part of this may have been related to the sloppy stove pipe vent that was updated, that I never knew about.


Be kind to your differential.